How to Take the Best Photos for Your Plastic Surgery Assessment in Thailand

📸 Good Photos = A Faster Assessment
Clear, well-lit photographs help your surgeon accurately assess your anatomy, recommend the most appropriate procedure, and prepare your surgical quotation.
Following the simple guidelines on this page can help reduce delays, minimize the need for additional photographs, and ensure your assessment is completed as quickly and accurately as possible.
What You'll Learn
On this page you'll learn:
✔ Why your assessment photos are so important.
✔ How to take clear, high-quality photographs.
✔ What to wear for different procedures.
✔ How to take your own assessment photos using your phone.
✔ Why you shouldn't edit or filter your images.
✔ Where to find the correct photo guide for your procedure.
✔ How we protect your privacy.
A clear set of photographs is one of the most important parts of your plastic surgery assessment. Before recommending any procedure, your surgeon carefully reviews your images to assess your anatomy, determine whether you're a suitable candidate for surgery, recommend the most appropriate procedure, and prepare an accurate surgical quotation.
We understand that taking these photos can feel a little uncomfortable, but the clearer and more accurate they are, the quicker your assessment can be completed and the less likely it is that we'll need to request additional photographs.
Why Your Assessment Photos Matter
Your assessment photographs provide your surgeon with valuable information that simply can't be gathered from a written description alone.
Your photos help your surgeon to:
● Assess your anatomy and current condition.
● Determine whether you're a suitable candidate for surgery.
● Recommend the most appropriate procedure to achieve your goals.
● Identify whether additional or alternative procedures may provide a better outcome.
● Prepare an accurate treatment plan and surgical quotation.
If your photos are unclear, too dark, or don't show the required angles, your surgeon may not have enough information to complete your assessment.
This may delay your quotation while additional photographs are requested.
Use Good Lighting
Good lighting makes a significant difference to the quality of your assessment photos.
Natural daylight is ideal because it provides the most accurate representation of your skin tone, body contours and facial features.
For the best results:
● Stand facing a window or outside in natural daylight.
● Avoid standing with a bright window behind you.
● Avoid dim lighting or harsh overhead lights.
● Ensure the treatment area is clearly visible.
Choose a Plain Background
A plain, uncluttered background helps your surgeon focus entirely on the treatment area without unnecessary distractions.
A simple wall works best and makes it easier for your surgeon to accurately assess your photographs.
Wear the Right Clothing
The clothing you wear depends on the procedure you're interested in.
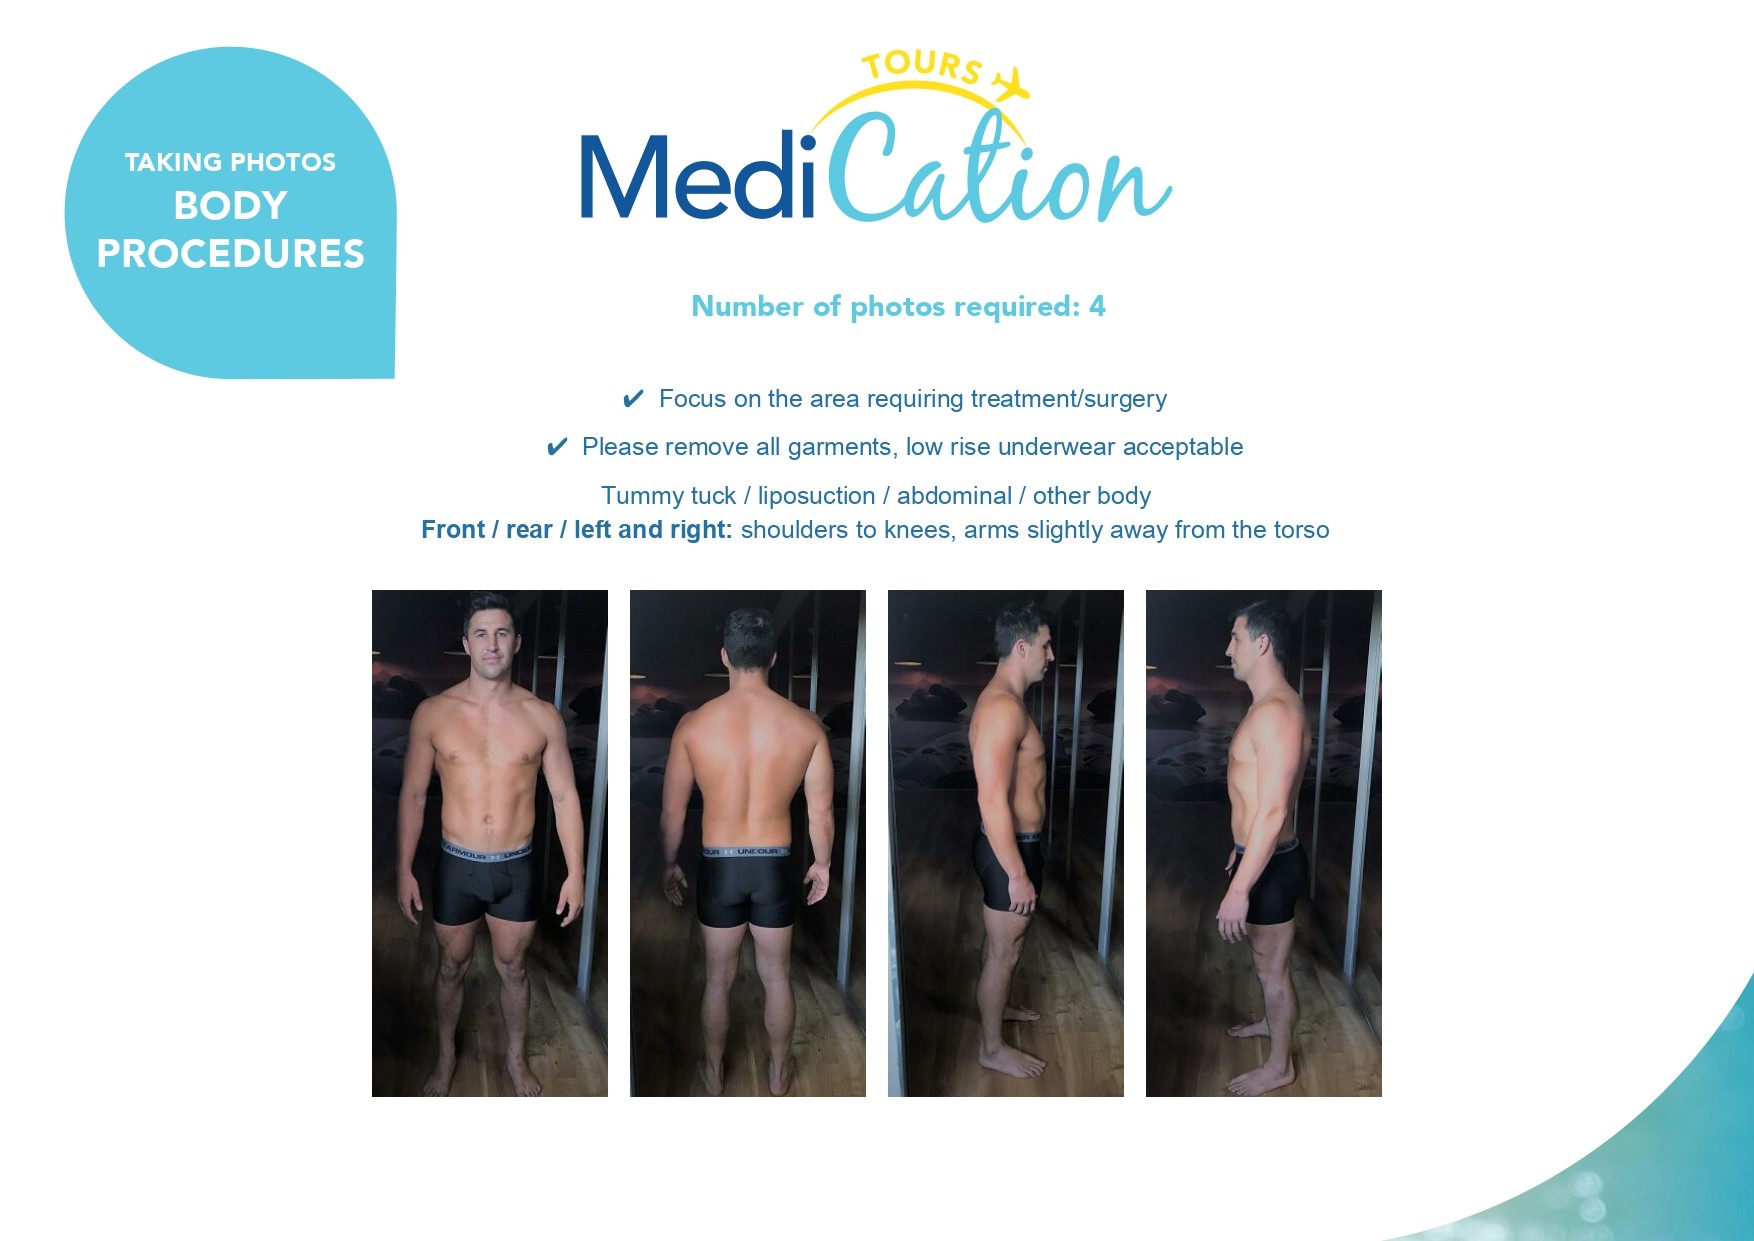
For example, if you're requesting a tummy tuck assessment, photographs should be taken wearing bikini briefs or underwear that exposes the entire abdominal area. Front, side and back photographs are usually required.
The back view allows your surgeon to assess the flanks and determine whether an extended tummy tuck may be recommended.
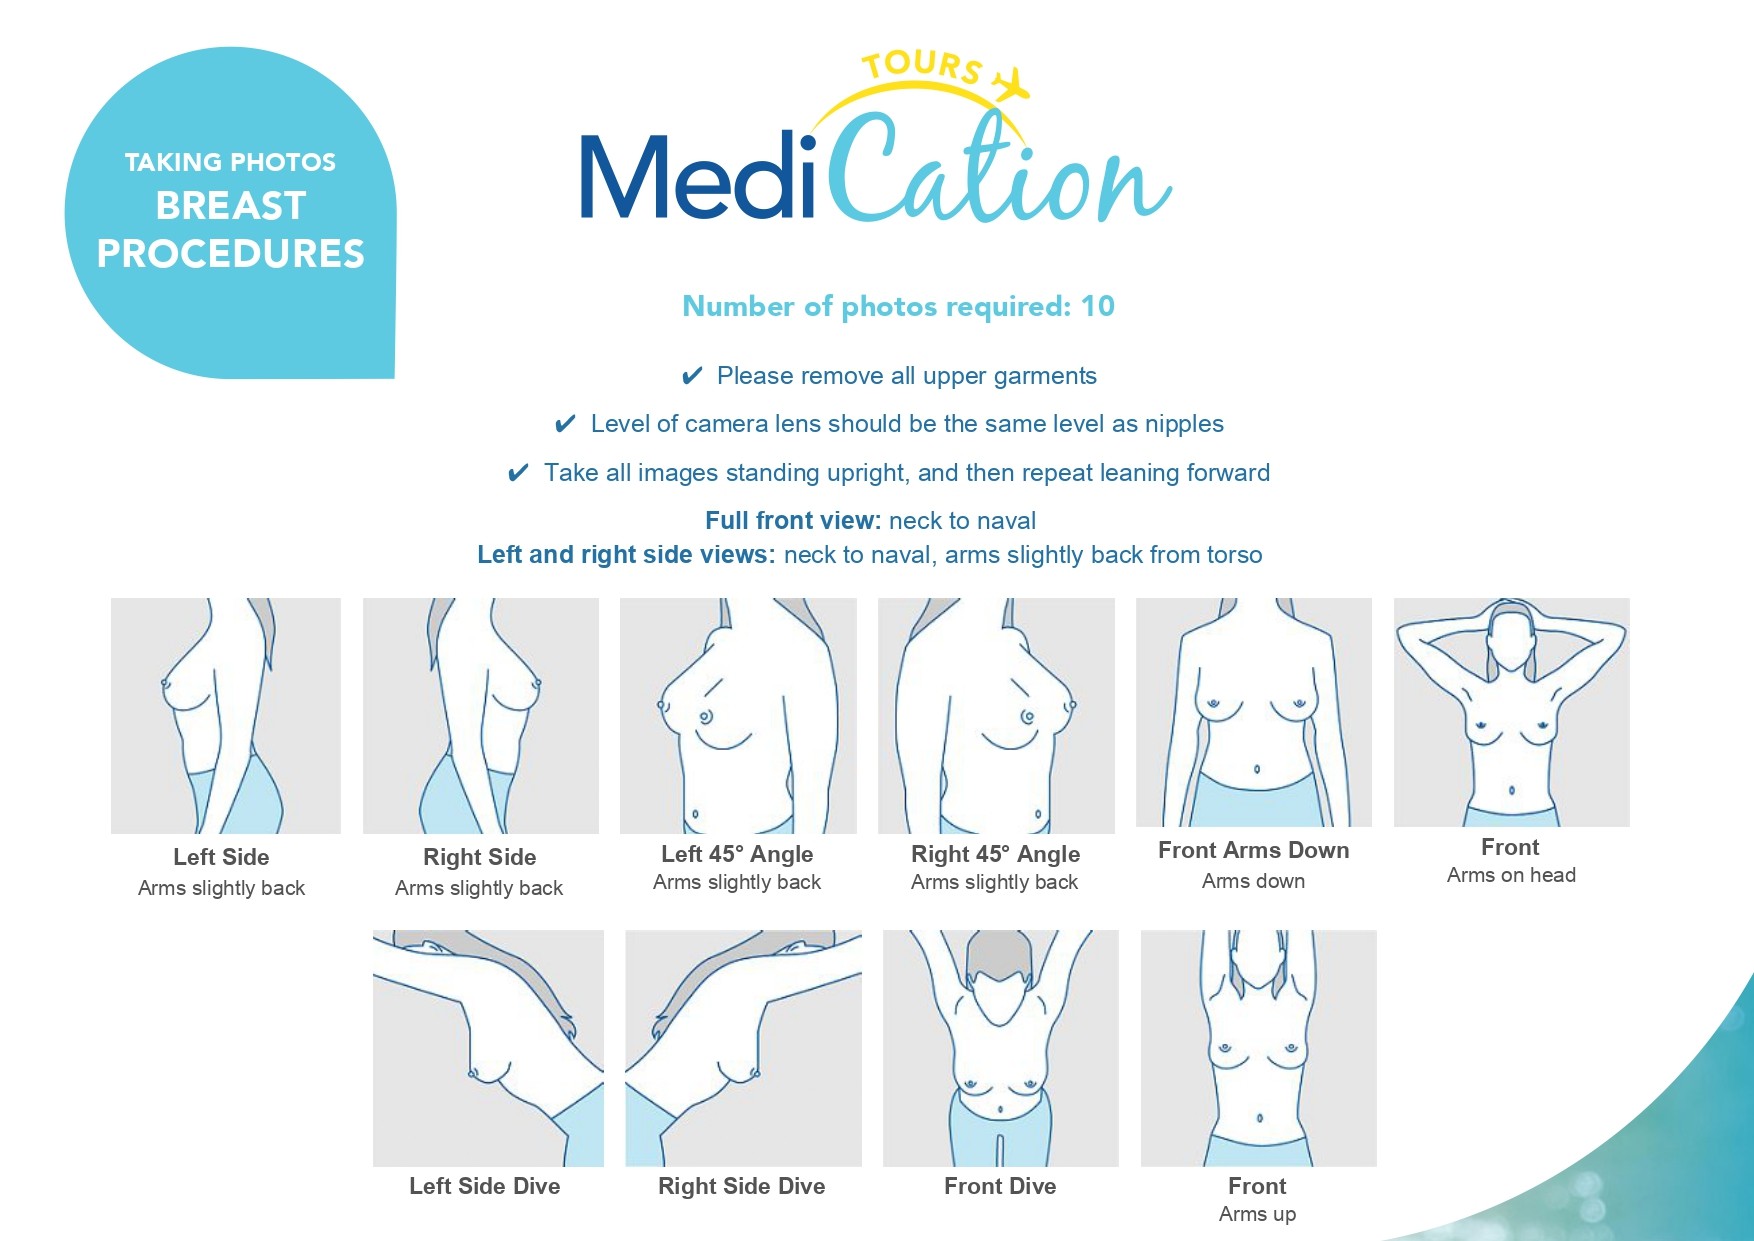
For breast surgery assessments, you'll be asked to remove clothing covering the chest so your surgeon can accurately assess breast shape, symmetry and skin quality.
Please remove jewelry, watches and accessories from the treatment area unless instructed otherwise.
Don't worry if you're unsure what to wear. Your Patient Coordinator will provide clear instructions based on the procedure you're considering.
Can I Take My Own Assessment Photos?
Yes. If possible, ask a family member or friend to take your photographs, as this usually provides the best angles and the clearest images.
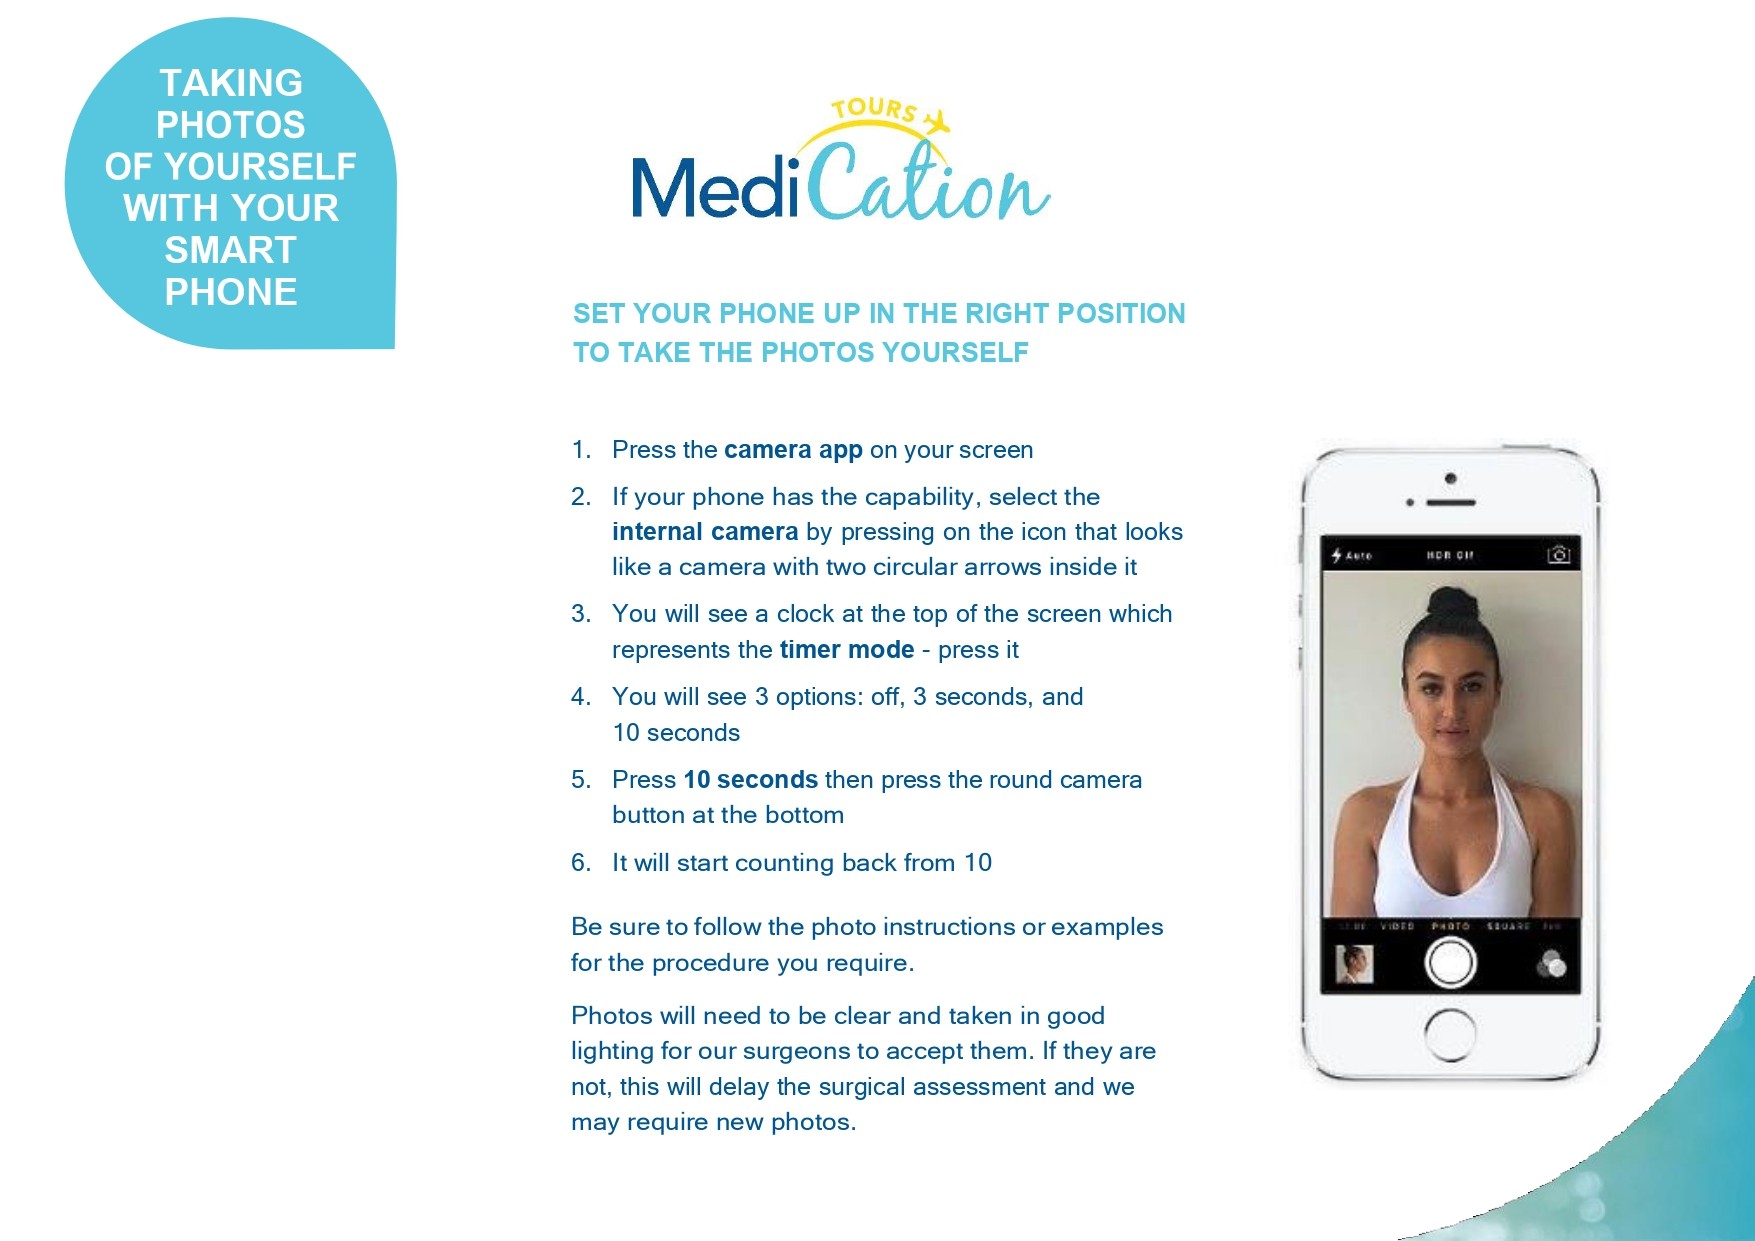
If you're taking the photos yourself, use your phone's timer and place it on a stable surface. Avoid holding your phone for selfies, as this can distort the image and make it more difficult for your surgeon to complete an accurate assessment.
If you need help taking your own photographs, we've created a simple step-by-step guide to walk you through the process.
Please Don't Edit Your Photos
Please don't use beauty filters, editing apps or photo enhancements.
Your surgeon needs to see your natural anatomy to provide the safest and most accurate assessment possible.
Please avoid:
● Beauty filters.
● Skin smoothing.
● Cropping important areas.
● Excessive brightness or color adjustments.
Natural, unedited photographs always provide the most accurate information.
Follow the Photo Guide Carefully
Each procedure requires different photographs and specific angles.
Following the photo guide carefully helps your surgeon complete a thorough assessment without needing to request additional images.
Taking a few extra minutes to capture the correct angles can save days during the assessment process and help ensure you receive the most accurate surgical recommendation possible.
Photo Guides for Each Procedure
To make things easy, we've created simple, step-by-step photo guides for each procedure.
Select the guide that matches the surgery you're considering:
● Taking Your Own Assessment Photos
● Breast Surgery Photo Guide
● Body Procedure Photo Guide
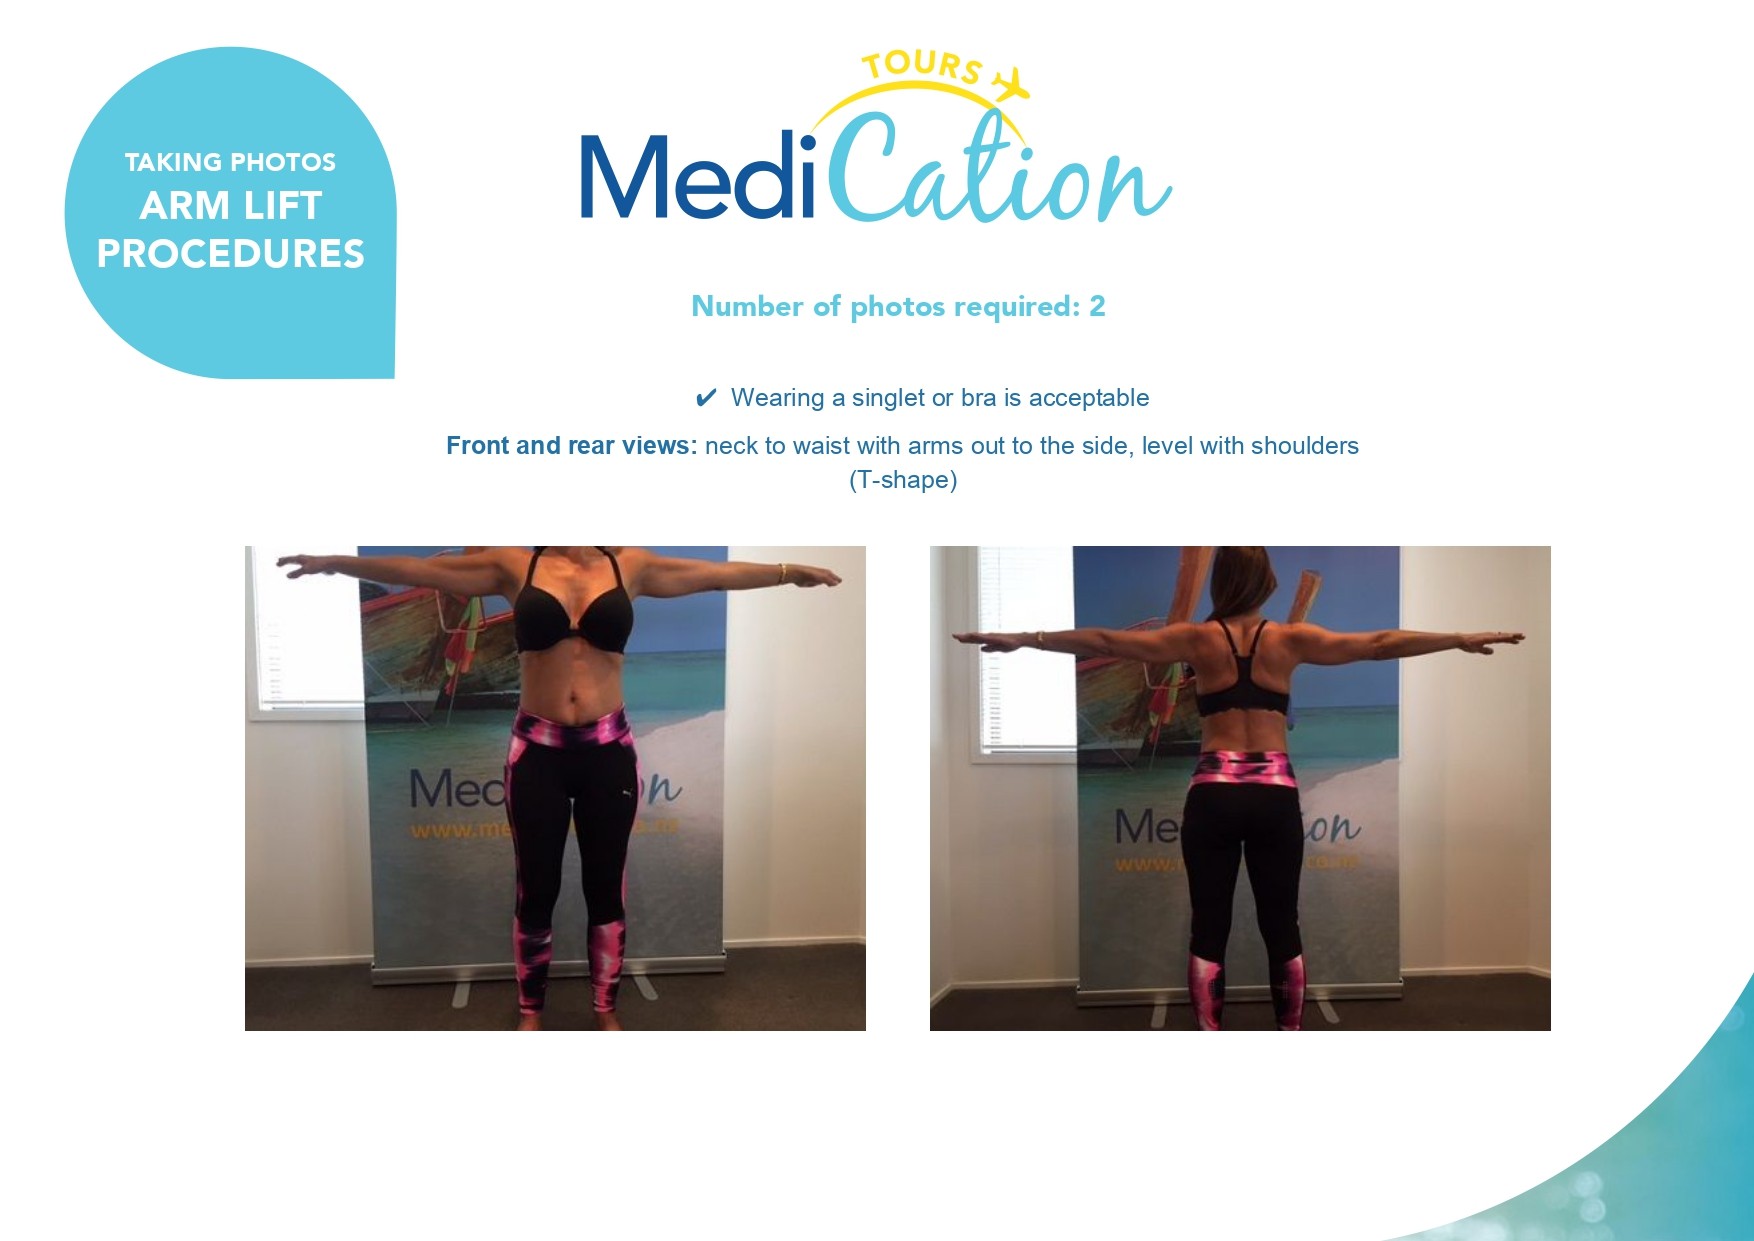
● Arm Lift Photo Guide
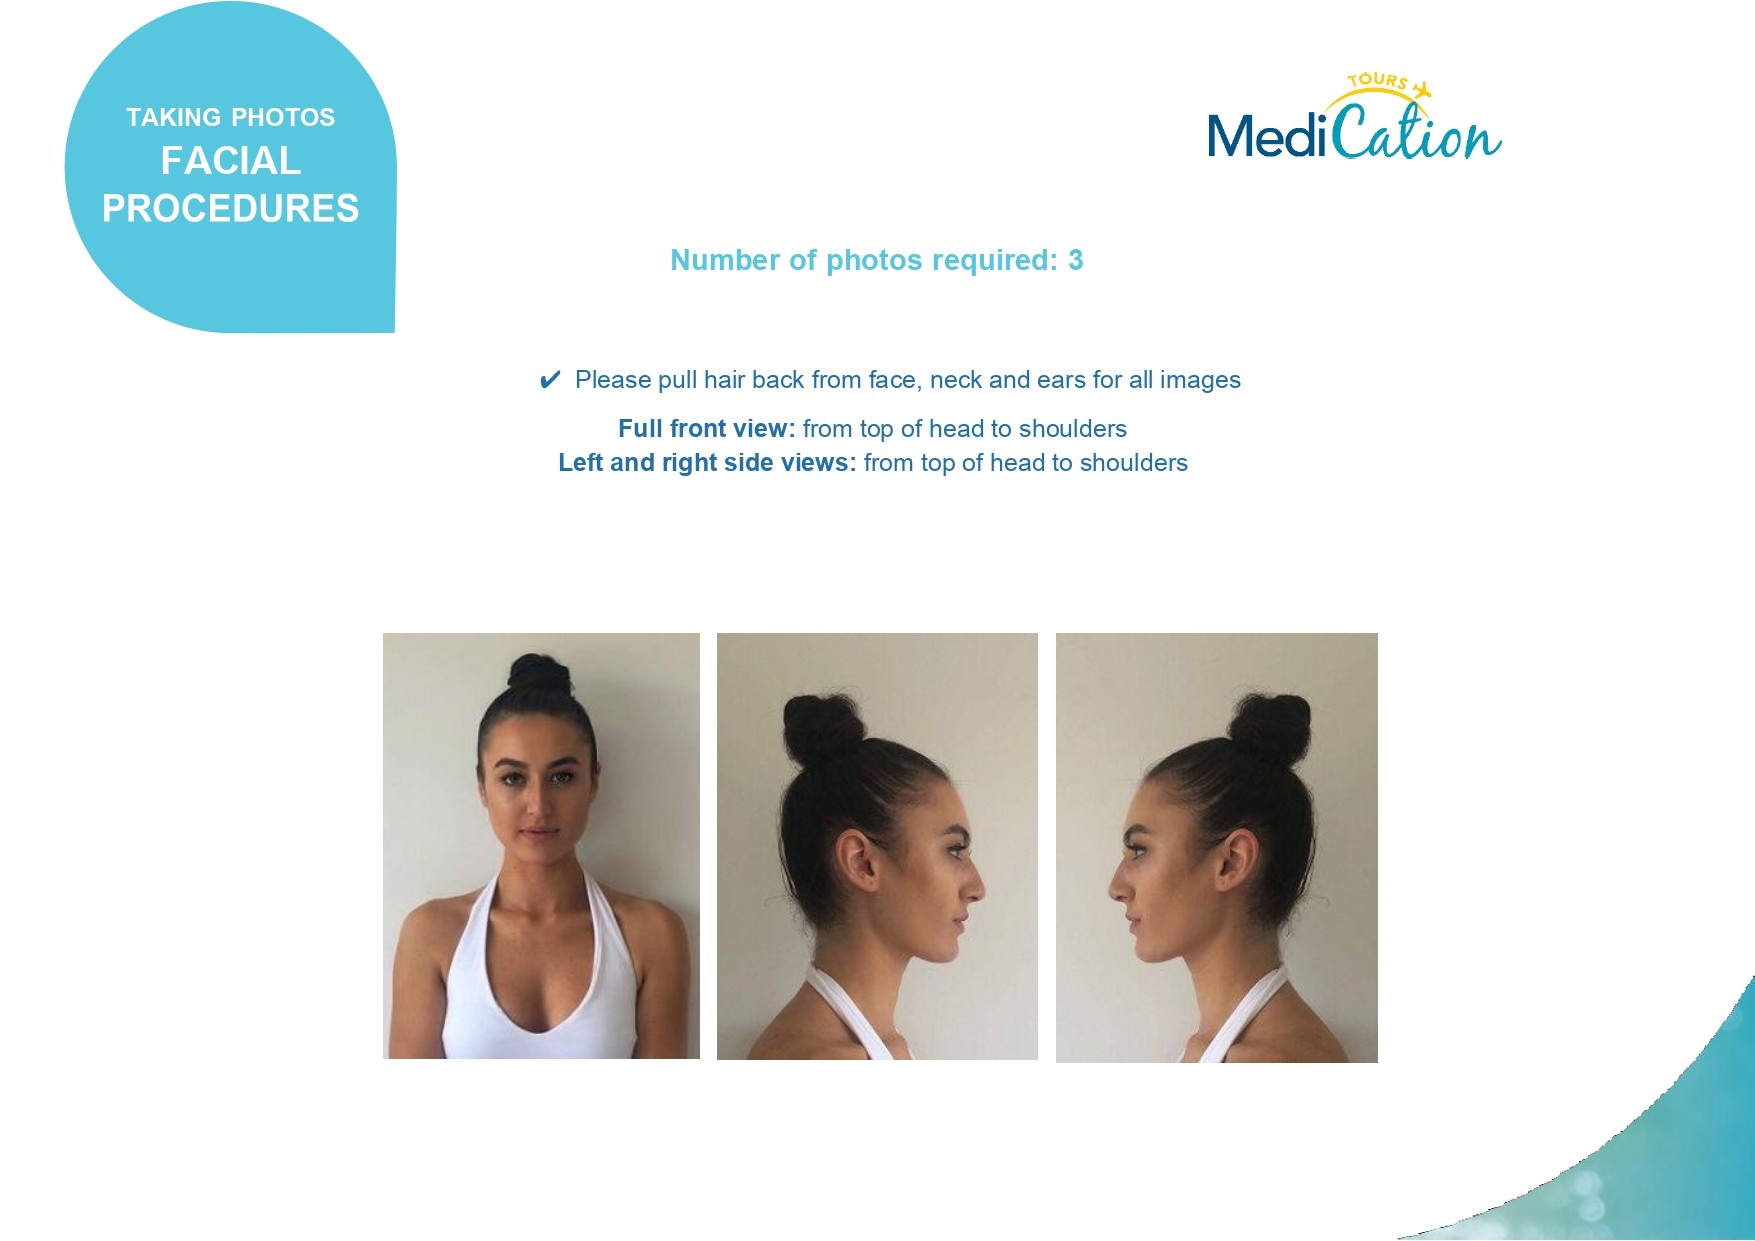
● Facial Surgery Photo Guide
● Rhinoplasty Photo Guide

● Dental Procedure Photo Guide

Your Privacy Is Our Priority
We understand that these photographs are personal, and protecting your privacy is extremely important to us.
All photographs are treated as confidential medical information and are shared only with the surgeon and medical team involved in your assessment.
Your images will never be shared with anyone else or used for marketing or promotional purposes without your written permission.
Better Photos Mean Faster Assessments
Taking just a few extra minutes to provide clear, well-positioned photographs can make a significant difference.
High-quality photos help your surgeon complete your assessment more efficiently, resulting in:
● Faster surgical assessments.
● More accurate treatment recommendations.
● More accurate surgical quotations.
● Fewer requests for additional photographs.
● Less delay in planning your surgery.
If you're unsure whether your photos meet the requirements, simply send them to your Patient Coordinator. We'll review them before forwarding them to your surgeon to help ensure everything needed for your assessment has been included.
Our goal is to make your plastic surgery assessment as simple, accurate and stress-free as possible. If you have any questions or need assistance taking your photographs, your Patient Coordinator is always happy to help.
Ready to Get Started?
Complete your online assessment form and upload your photographs using the appropriate photo guide for your procedure. Once we've received your information, we'll review everything before forwarding it to your surgeon for assessment.
We look forward to helping you take the next step towards your surgery in Thailand.